László Moholy-NagyLászló Moholy-Nagy was a Hungarian painter and photographer as well as professor in the Bauhaus school. He was born on July 20th 1895 and unfortunately died on November 24th 1946; he lived a total of 51 years, which is still quite a young age to die. He was born to a Jewish-Hungarian family and attended Gymnasium Academic High School.
In 1923, he replaced Johannes Itten as the instructor of the foundation course at the Bauhaus. The Bauhaus became known for the versatility (having a wide variety of skills) and of course, László was no exception to this. Throughout his career, he became thoroughly interested in the fields of photography, typography, sculpture, printmaking, and industrial design. Photography was one of his main focuses. He believed that photography could create a whole new way of seeing the outside in a way that the human eye could not. He called this view, "The New Vision" and there is a book published with the same name, explaining all about his theory of art. Moholy-Nagy then moved on to experiment with photograms, much like the ones that we created in class. A few of his works can be seen to the side. |
|
Photograms/Rayographs Lesson
|
In our Photograms/Rayographs lesson, we learnt about the process of how to create Photograms and then made our own in the dark room. A Photogram and a Rayograph are basically the same thing. They are described as, "a photographic
image made without a camera by placing objects directly onto the surface of a
photo-sensitive material such as photographic paper and then exposing it to
light. The result is a negative shadow image varying in tone, depending on the
transparency of the objects used."
The process was much like the cyanotypes process, except this process was taking place in the dark room. So once again, we had a box of objects (plus our own) which we then went through and selected a few to place on our Photogram paper. Every person had a space to themselves which included a machine which shone down a light on our paper covered in the objects we chose. After a few seconds, the light flicked off and then we had to put or Photograms into a tray of chemicals which we left in there for a couple of minutes. |
After the couple of minutes was up, the images were moved on to another chemical tray using the tongs left out. The images were only left in the second tray for a few seconds before we moved on to the third tray of which we had to leave our images in for a longer period of time.
During this process, we had to make sure that we didn't cross the chemicals by using the wrong tongs in the wrong trays. It was alright when moving forwards in the line of trays, but if the same tongs were used moving backwards then the chemicals would have been cross-contaminated. After a while, we went back to our images and moved them from the third tray into a tray of water to wash off any excess chemicals. After rubbing them around the water a little bit, we used "squeegees" to squeeze off any water so that the images wouldn't drip when we hung them up to dry, which is what we did next. |
|
|
Evaluation
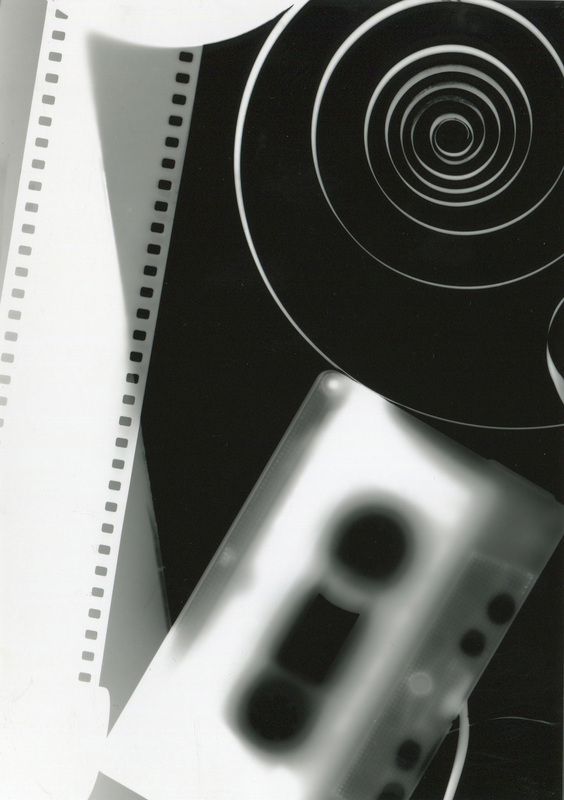
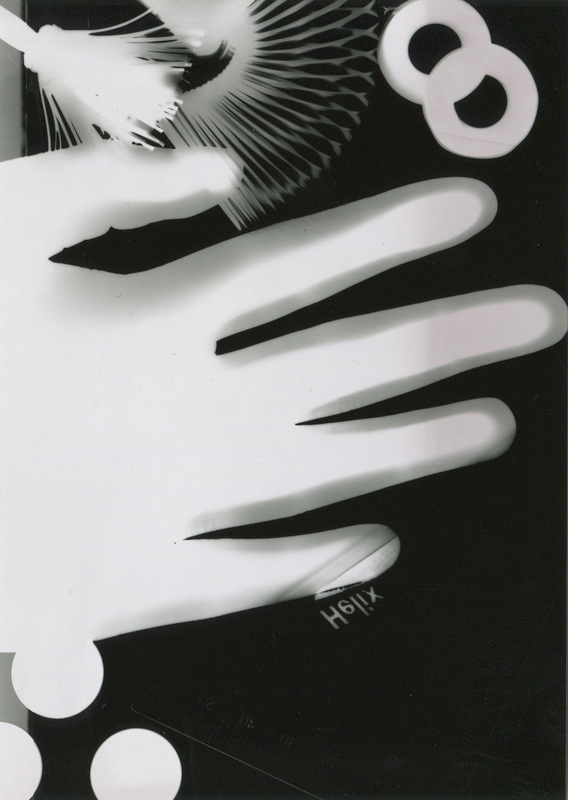
Up above are my two Photogram images that I created. I am quite proud of the two images that I made and I prefer them more than the cyanotypes that I created the previous week. I do not particularly prefer one to the other; I think they are both of the same sort of standard. Using my experience of creating cyanotype images, I was able to make my Photogram images better than they could have been. I used less objects and made sure that each image had a sort of main focus. The first image's main focus to me was the cassette tape, although it could vary, and the second image's focus was obviously the hand. In the first image I made, I like that I only used three objects, as I think it made the image more effective in a way that could make viewers easily notice details rather than having to look all over the place at the many different objects on the paper. On the second image, I again used very few objects, but a few more that the first image. The hand idea was an idea that I grasped whilst viewing other people's work, I saw it and liked it and so decided to work with it. A few of the objects on the second image were placed above the paper in order to create a shadowy effect, much like one of the cyanotype images I made. The shadows can be seen where the print is less think and bold as the others on the page, I like this a lot because it gives the image variety which is great when thinking about the usage of photographic effects.
